Hi there! It’s nice to be back after last week’s hiatus.
If you’ve followed along on my weekly posts on blogging, you’ve probably picked-up on my not-so-subtle belief that without strong content and without great supporting photos, you will likely struggle to gain an audience.
I’ve written about improving your content, and I’ve written a (very brief) tutorial on editing photos. But what if you’re ready to upgrade your equipment? How do you go about choosing which camera is right for you?
Hopefully, today’s post can point you toward selecting the right camera for your needs.
The most important thing to understand when buying your camera goes right in line with one of my life mantras:
Know your WHY.
Unless you have the extra cash sitting around and don’t care about your new camera’s price tag, you’re going to want to look around and make a smart, informed decision about where to invest. Once you understand what you’re purpose is, then you can shop to find the best tool for the job.
The second most important thing realize is that if you’re shopping for a DSLR camera (the ones that are usually higher-dollar cameras with interchangeable lenses), the camera body itself doesn’t account for much (please don’t yell at me for that … because it’s true). The glass attached to that camera matters more. And furthermore, hands down, the most important part of that expensive, fancy camera is the person behind it.
But all that being what it is, let’s jump into it.
Pick Your Style
The first thing to get your head around is what’s available.
Great photos are taken every day using a phone’s camera. Don’t discount its possibilities — especially if you’re using a newer phone with some neat intelligence built into the camera app.
There are also some stellar point-and-shoot cameras, and you can really work some magic with some of these if you know how to use the camera’s settings. There are some Canon point-and-shoots that have a lot of the same features as their low-end DSLR cameras, but it has a fixed lens and a much lower price tag.
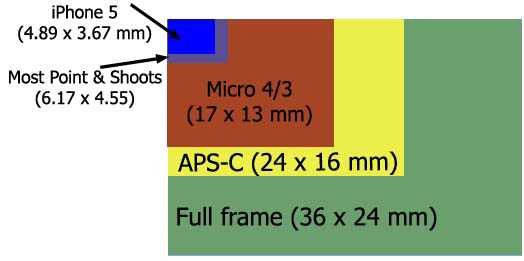
If you’re interested in the DSLR cameras with interchangeable lenses, you have (basically) two families to select from: Full Frame, which is typically a professional-grade line of camera, and Cropped Sensor (APS-C), which is the beginner/amateur line.
In a nutshell, full frame cameras have a sensor the same size as traditional 35mm cameras. Cropped sensor cameras have, well, a smaller sensor. The sensor is important because it’s responsible for capturing the image, and a full frame sensor allows more attributes to be recorded … more pixels, deeper color, better light, etc.
An APS-C’s cropped sensor is smaller than a full frame’s. A point-and-shoot’s sensor is typically much smaller than a cropped-sensor. And a smart phone’s sensor it comparatively tiny.
That being said, you can still shoot incredible photos using cropped sensor cameras, and you can shoot terrible photos using a full frame. Why?
Because what ultimately makes a photo great … is you. The decisions you make about the photo will control how strong the image is after it’s processed.
More or less.
What’s Your Why?
If you want a camera solely for shooting photos on your blog, you’re in a great position! Here’s why: The end result (the photo that makes it to the web site) is going to be minuscule.
High end cameras can take pictures that are so large they can be displayed on a billboard without any degradation; however, you’re not aiming for that. You’re taking photos for a website, where the goal is to have a glorious photo so small it doesn’t hinder page load times.
My suggestion for those looking only for web-friendly photos is to shop for a low-end DSLR with high-end lenses. Check out eBay or CraigsList. A great option might be a Sony because most Sony DSLR cameras will accept old Minolta lenses — and there are a lot of really old, really great lenses for sale for cheap!
But make sure you know what you’re shopping for! Know what’s out there, read the reviews, and make an informed decision.
When I was shopping for a camera, blogging wasn’t a major part of our lives.
I selected my camera because of our unnamed child. She was a basketball cheerleader and a gymnast, and that meant taking photos in horribly challenging venues:
- We were typically a good distance from the action;
- The lighting was terrible;
- No flash was allowed; and
- The movements were fast.
In this case, my Why had everything to do with finding something that can shoot in the above situation and still have a nice, clean image.
But price matters also.
Exploring Options
While browsing around, I stumbled across a website that I quickly became addicted to: SnapSort
This site is ridiculously useful when shopping for options. There’s a link on the upper right called Recommend. From here, I can select DSLR, I can set a price range (under $1,200), and whatever other options I want.
The first time I did this I was surprised by the results. I expected Canon or Nikon to top the list, but I saw a lot of Pentax and Sony brand cameras and only a few of the big brands.
After a little more poking around on the site, I learned how to read their data that backed-up their rankings, and made an informed, confident decision to go with a Pentax K-5 (which I love).
One of the other things I love about SnapSort is being able to click on a potential camera and then see how it stacks-up against its competitors.
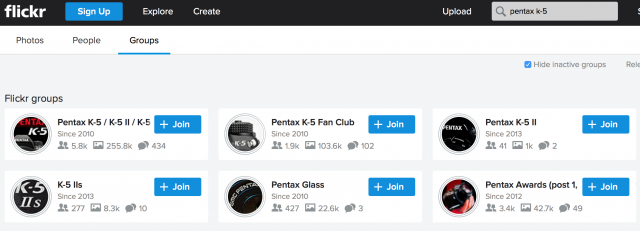
Another great way to glean some information on your potential camera is looking at Flickr. Flickr is a great photo service, but it also is great for browsing what others are doing with your exact model of camera. Using the search field, you can look up photos tagged with your brand or model.
Also, once you search, you have an option for exploring Flickr Groups that pertain to your search (by clicking the “Groups” link along the top of the search window). Browsing through these groups, you can pick-up all sorts of great info about annoyances, problems, things people love, etc. You’re basically listening-in on chatter about the camera from the owners.
Lastly, check out Amazon and read their reviews — but don’t let one knucklehead’s bad review taint your opinion. You should be able to pick-up the quality of a camera by what most people are saying in the reviews.
Choosing A Lens
This section is simple, I recommend as good of a prime lens (fixed millimeter) as you can afford. A prime lens is set at a specific distance, so there’s no zoom unless you move your entire camera nearer to or further from the target. Prime lenses also, normally, take clearer shots.
For a zoom lens … same thing: buy the best one you can afford.
Glass matters. Do your homework, but understand, typically, you get what you pay for with lenses.
If you’re planning on buying a camera and plan on using the kit lens … give that some extra consideration. Typically, the lenses that ship with the camera are OK at best.
IMPORTANT NOTE: If you opt for a cropped sensor camera, the lens “size” is not truly what you’re getting. In other words, if you buy a 50mm prime lens, on a full frame camera, it’s a true 50mm; HOWEVER, on a cropped sensor, it’s actually closer to 75mm.
Why??? In order to see the “real-life” lens size for a cropped sensor camera, you need to multiple the mm by 1.5. That varies by model, but it’s generally around that conversion.
Want more detail … Google it. There’s a lot of smarty science behind it.
But here’s why it’s important. If you plan to shoot furniture (or something in closed spaces), you’ll need to account for the size conversion.
Example: In Shanna’s situation, we want to shoot a dresser in our living room. In order to get the clearest shot I can, I use my 50mm prime lens, but since the dresser is large, I can’t back-up enough, because of the room size, to fit the entire piece in the frame because I’m actually shooting the equivalent of a 75mm lens and not 55mm.
Sorry to bore you. This is something you can ask me about later…
You’re The Greatest Tool
No disrespect intended. 🙂
Before you start playing with your new camera, you need to learn to shoot. Read the camera’s manual. Once you’re finished, read it again. Download it from their web site and save it to your phone.
Invest in some online classes. The folks over at Shoot Fly Shoot have a brilliant video series explaining how to take great photos.
Want something FREE? Check out My 3 Boybarians. She has a GREAT tutorial on improving your photography skills.
Also, I love Fro Knows Photo because he has great tips for shooting AND processing photos using Adobe Lightroom.
And practice. Digital Photography School has weekly challenges (and tons of other info). Even if you don’t submit photos, take the weekly challenge just so you can practice how to shoot. Even if it doesn’t have anything to do with what you do. In fact, ESPECIALLY if it doesn’t have anything to do with what you do.
You. Must. Learn. To. Shoot.
And please do me a favor, if you buy a fancy, higher-end camera, never, ever, ever shoot on AUTO mode. That’s a travesty because when you do that, you’re simply using a very expensive point-and-shoot.
Learn how to use your camera. Learn how to shoot. And learn how to play with the various modes on the dial.
I promise you, if you take the time to learn the art, you’ll fall in love with it, and you will take better photos no matter what camera is in your hands — whether it’s furniture, your kids, your pets, a sunrise, or a fancy car. It will be a better photo because you understand depth of field, exposure, backlighting, and the rule of thirds.
So that wraps it up for me this week. If you have any questions, please feel free to ask in the comments below.
And if you get a moment or two, please check out my previous posts on blogging.
Thanks!
 |
 |
 |
 |
 |
 |


Leave a Reply